


Get a Powerful Low-End: Mix Kick and Bass Like a Pro in 8 Simple ways [062]
Mix Kick and Bass Without Clashing Frequencies

Hi there,
Today I want to share a practical and insightful guide on mixing kick and bass—an area that often separates an amateur mix from a professional-sounding track. This isn’t just a checklist of techniques. It’s a way of thinking about the low end: sculpting it with clarity, intention, and a touch of creative finesse.
Let’s explore what can go wrong, what works, and—most importantly—why these methods are so effective.
Mixing Kick and Bass: A Guide to a Punchy Clean Low End
The low end is the foundation of almost every electronic track. But it’s also where mixes often fall apart—muddy, weak, or overly aggressive. When kick and bass compete for the same space, the result is usually less punch, less clarity, and less emotional impact. Getting this balance right can transform a track from decent to powerful.
Below, I’ll walk you through several proven techniques. Each one serves a clear purpose and offers a different way to shape how your low-end elements interact. These are techniques I use myself, and ones I return to because they consistently deliver.
1. Multiband Sidechain Compression: Precision for you Bass
One of the most effective - and often overlooked—techniques is multiband sidechain compression. Unlike a traditional sidechain that ducks the entire bass signal, this approach targets only the frequency range where kick and bass overlap. Typically, that’s somewhere below 100–200 Hz.
Why it works:
It preserves the character of your bass (especially the mids and highs) while still giving the kick the space it needs to punch through.
How to do it:
Set the range: Focus the compression band around 60–120 Hz (adjust to taste).
Use fast attack and lookahead: This ensures the compressor reacts just before the kick lands, tightening the interaction.
Fine-tune the release: Let it rebound quickly, but not so fast that it causes pumping.
Example:
If your kick dominates around 60 Hz, duck the bass only in that region. The result is clean, punchy, and musical.
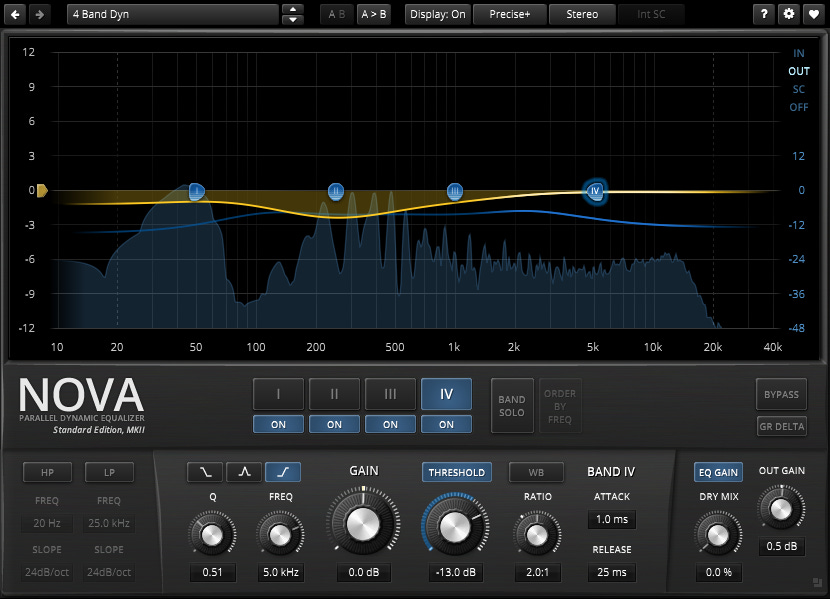
When I’m working on low-end, especially kick and bass, I often reach for the Free Plugin TDR Nova, and here’s why:
It’s not a traditional multiband sidechain compressor, but I use it like one all the time.
Nova is a dynamic EQ, which means I can set a band—say, around 60 to 120 Hz—and make it react only when something triggers it. If I send my kick drum into the sidechain, I can get that band on the bass to duck only when the kick hits. That keeps the low end tight and clear without killing the bass tone.
So instead of compressing the whole signal, I’m just taming the exact frequency range where kick and bass overlap. It’s extremely transparent and provides me with significantly more control than a regular sidechain compressor.
I use it all the time when I want clean, punchy low end that translates well on all systems.
2. EQ Carving: Give Each Element Its Zone
EQ Scalpel - it lets you carve out space so that kick and bass don’t trample each other.
Why it works:
When you assign each element its own territory, you avoid frequency masking and preserve clarity.
How to do it:
Identify dominant frequencies: Maybe your kick peaks at 70 Hz, and your bass fills out 100–200 Hz.
Make small, strategic cuts:
Dip the bass slightly at the kick’s main frequency.
Lightly cut the kick where the bass shines.
Clean the extremes:
High-pass the bass at ~30–40 Hz.
Tip: Subtle moves (1–3 dB) often have the biggest impact without sacrificing tone.
3. Phase Alignment: The Hidden Saboteur
Even with great EQ and compression, your low end can sound weak if the waveforms are out of phase. This is one of the most common and least intuitive issues in low-end mixing.
Why it matters:
Out-of-phase signals cancel each other out, making your low end sound hollow or thin.
How to fix it:
Flip polarity: Most DAWs or plugins offer a simple phase-invert button. Start there.
Manual nudging: Shift one element (kick or bass) a few milliseconds to find the sweet spot.
Use alignment tools: Plugins like Auto-Align analyze and correct phase issues with precision.
Example:
If your kick and bass sound great solo but weak together, this is often the culprit.
4. Dynamic EQ: Subtle and Intelligent Control
Dynamic EQ blends the responsiveness of compression with the precision of EQ. It allows you to tame specific frequencies only when they become problematic.
Why it works:
It’s a transparent, mix-friendly way to deal with overlap without dulling your sounds.
How to do it:
Set a dynamic EQ band (say at 60 Hz on the bass).
Sidechain it to the kick using Free Plugin TDR NOVA, so it only dips when the kick hits.
Tip: As with carving EQ, small changes (1–3 dB) are often enough.
5. Transient Shaping: Sculpting the Attack
Transient shapers let you emphasize or soften the attack and sustain of your sounds, without affecting volume.
Why it works:
You can enhance the punch without relying on EQ or limiting.
How to use it:
Kick: Boost attack for extra punch or reduce if it’s too clicky.
Bass: Increase attack for more definition, or reduce sustain to make room for the kick.
Example:
If your kick feels buried in the mix, boosting its transient can bring it to life, without needing to increase volume.
6. Saturation: Add Warmth and Presence
Saturation introduces subtle harmonic distortion, making your low end richer and more audible, especially on small speakers.
Why it works:
Those added harmonics help your bass and kick translate better across different systems.
How to use it:
Bass: Apply tape or tube saturation to enhance harmonics.
Kick: Use gentle drive for warmth or character.
Together: Lightly saturate a bus containing both to glue them together.
7. Gating and Automation: Take Control Where Needed
These are precision tools for moments when other techniques aren’t enough.
Why do they work?
They give you surgical control over timing and space.
How to use them:
Gating: Trim long tails or rumble from kicks and bass lines.
Automation: Manually duck the bass with volume automation to match the rhythm and groove.
8. Sound Selection & Arrangement
No amount of processing can fully rescue poorly chosen sounds.
Why it works:
A great mix begins with smart choices.
What to consider:
Match tone and character: A deep subby kick pairs well with a mid-focused bass.
Space out their hits: If they always land together, they’ll always clash.
Tune them: Make sure the kick’s pitch complements the track’s key and the bassline.
Final Thoughts:
For most producers, mixing the kick and bass is the most difficult part, mainly due to poor listening environments. If you can't judge what's happening in the low end, your mix might suffer and won't be optimised perfectly during mastering.
The above techniques offer you options, not rules. The real power lies in your ability to listen deeply, understand what your track requires and apply the appropriate tool at the right time.
A few guiding principles:
Trust your ears more than your eyes.
Start with good sounds—processing is not a fix-all.
Keep changes subtle and purposeful.
When the low end is right, your whole track feels solid. It moves people. And that’s what great mixing is ultimately about.
Thanks for reading—hope this brings clarity to your process and confidence to your mix decisions.
PS: If you're not sure about the mix or mastering of your electronic music tracks, get in touch to finalise them.
Best regards,
Marcus