
Clipper vs. Limiter when Mixing? [026]
Understanding Clipping vs Limiting to shape your mix.

Taming the Transients: Limiters and Clippers on Submix Buses
When mixing a song, I usually work in groups. I then divide these so-called submix busses into kick, bass, drums, synth, vocals, and FX, to which the individual tracks are routed.
I need a pleasing mix before mastering, where no element is suddenly too loud or has too strong peaks. Because this could negatively affect a mastering compressor or other effects on dynamic processing.
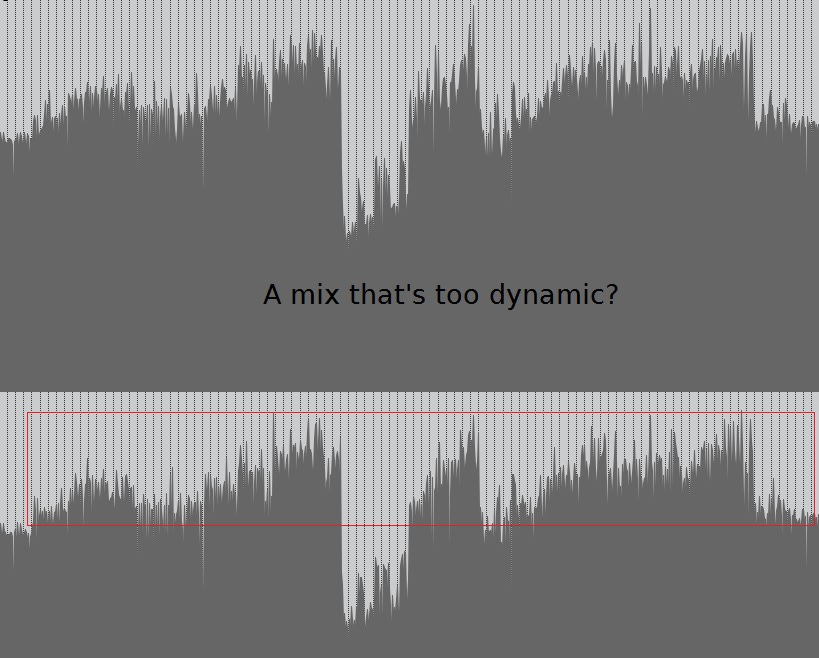
If individual tracks within a submix have unruly peaks that threaten cohesion, I use limiters and clippers to control the maximum level.
If a limiter or clipper is needed for transparency, I use these tools to work subtly, with a gain reduction of 1-2dB, almost inaudible.
Why limit or clip the entire signal when mastering when you can capture the peaks while mixing the subgroups?
Doing so will result in a much clearer and balanced outcome compared to using these tools only during the mastering stage.
Knowing the strengths and weaknesses of limiters or clippers will help you understand when and why to use them on submix buses.
Limiters: When to Use Limiters on Submix Buses
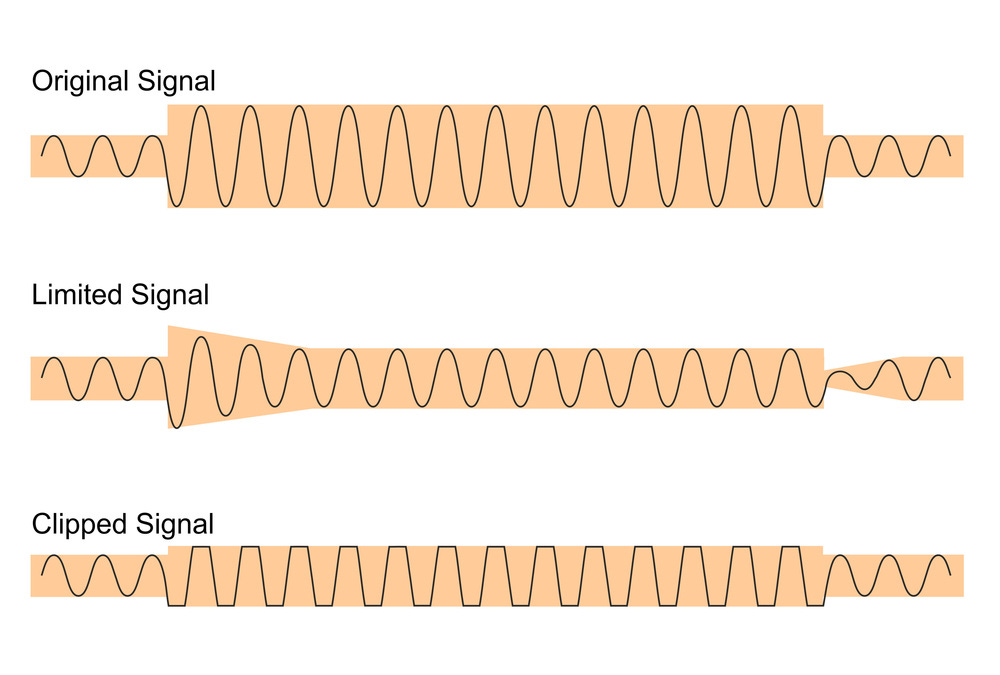
A limiter acts as a volume ceiling, preventing any signal from exceeding a set threshold. This ensures your mix doesn't clip (distort) digitally, maintaining overall clarity. On sub-mixes, limiters serve several key purposes:
Peak Taming: Sudden, powerful drum hits can temporarily overwhelm the mix. A limiter on the drum submix addresses these peaks.
Smoother Overall Mix: A limiter controls peaks on individual sub-mixes, preventing them from overpowering other elements in the mix. Controlling its dynamic range leads to a more consistent overall sound.
Ensuring Headroom for Effects: Submixes often receive further processing, like compression or saturation. A limiter ensures enough headroom (unused dynamic range) for these effects to work effectively and more transparently or subtly.
Limiter Considerations:
Dynamic Instruments: Drums, percussion, Vocals, Synthesizers, or recorded instruments are prime candidates for submix limiting due to their naturally transient nature. A light touch with the limiter helps control those peaks while maintaining the instrument's character.
Threshold: Set the threshold just high enough to catch unwanted peaks without affecting the overall level. Excessive limiting can flatten the mix, sucking the life out of the dynamics.
Group Buss Compression: When using compression on a submix bus, a limiter placed before the compressor can prevent it from reacting too heavily to those transient peaks. This allows the compressor to focus on taming the overall body of the sound for a smoother result.
Clippers: Adding Bite and Character
A clipper works differently. Instead of hard stops, it creates a soft knee where the signal gently rounds off above the threshold. This can introduce subtle harmonic distortion, adding warmth, grit, or a vintage feel to your submix.
Clippers for Creative Control:
Aggressive Drums & Subtle Loudness Enhancement: Adding a clipper to the drum bus can provide more bite and punch, reminiscent of classic analog recordings. If submixes feel a bit low in the mix, clippers can subtly increase their perceived loudness."
Gritty synth or Guitars: Clipping the guitar bus or raw synth sounds can introduce a subtle overdrive, perfect for harder sound design.
Tamed Transients: Similar to a limiter, clippers can control transients, but with the added benefit of potentially enhancing the sonic character of the submix.
Parallel Compression Alternative: Clippers can also be used as an alternative to parallel compression, a technique that blends a compressed and uncompressed signal. By clipping a submix bus, you can achieve a similar effect of increased density and perceived loudness with a simpler workflow.
Clipper Considerations:
Genre-Specific Effects: Enhance the submix character for genres like Hard Techno, Trap(Kick drums) or other electronic styles which often benefit from the added warmth and grit clippers can introduce.
Amount of Clipping: A little goes a long way. Start with subtle -1/-2 db clipping and gradually increase until you achieve the desired effect. Excessive clipping can introduce unwanted harshness.
Bus Compression with Caution: While clippers can work with compression, be mindful of the potential for excessive distortion. Start with subtle clipping and adjust the compressor settings accordingly.
Genre Appropriateness: Clipping isn't suitable for all genres. Use it sparingly in softer-sounding styles that require pristine clarity, like classical or acoustic music.
Choose between soft clipping and hard clipping.

Use Soft Clipping for:
Smoother, More Transparent Control: Soft clipping gradually rounds off peaks, offering a more subtle and transparent way to control dynamics. This is ideal for situations where you want to tame peaks without introducing noticeable distortion.
Preserving Transients: Soft clipping allows some of the transient energy (the initial attack of a sound) to pass through, which helps maintain the punch and clarity of your instruments.
Glueing the Mix: The subtle rounding of peaks by soft clipping can create a more cohesive sound within the submix.
Use Hard Clipping for:
Adding Grit and Character: Hard clipping introduces a more pronounced distortion effect, which can add warmth, edge, or even a lo-fi vibe to your submix. This is useful for genres like rock or electronic music when you want a more aggressive sound.
Pushing Perceived Loudness (Use with Caution): Hard clipping can slightly increase the perceived loudness of a signal, but be very careful. Overusing it can quickly lead to harsh, unpleasant distortion.
Is a Limiter or Clipper the Right Tool?
The choice between a limiter and a clipper depends on your goals:
For transparent peak control and Subtle Cohesion, use a limiter.
Consider a clipper to add subtle grit, warmth, or a vintage character.
In some situations, you can use both! A clipper followed by a limiter can offer the best of both worlds, controlling transients while adding a touch of harmonic excitement.
Clipping is best for noise-like content such as drums, percussion and sometimes vocals, while limiters are optimal for constant, tonal content like bass and pads.
Clipping creates instant distortion with no memory, while limiters introduce memory to spread the distortion over time. However, limiters can have problems when the signal isn't steady. [Fabien TDR]
Ultimately, trust your ears or get help from your Mixing and Mastering Engineer :)
Cheers Marcus